 EN
EN AR
AR HR
HR CS
CS DA
DA NL
NL FI
FI FR
FR DE
DE EL
EL IT
IT JA
JA KO
KO NO
NO PL
PL PT
PT RU
RU ES
ES SV
SV IW
IW VI
VI TH
TH TR
TR FA
FA MS
MS
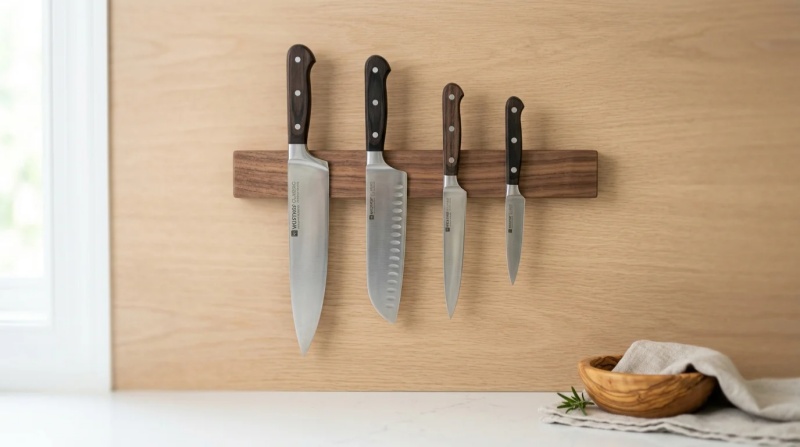
Introduction
A magnetic knife holder is a practical upgrade that frees counter space, protects blade edges, and keeps essential tools within easy reach. Building one yourself also gives you control over the size, wood species, magnet strength, and finish so it fits both your kitchen layout and your knife collection. In the steps ahead, you’ll learn how to choose materials, position magnets for reliable holding power, mount the holder securely, and avoid common mistakes that affect safety or performance. Whether you want a simple minimalist strip or a piece that matches your cabinetry, this guide will help you make a clean, durable holder that looks intentional and works every day.
Why build a magnetic knife holder
Constructing a magnetic knife holder offers functional and aesthetic advantages over traditional storage methods. By moving cutlery to a vertical plane, you can reclaim approximately 0.5 to 1.5 square feet of valuable counter space previously occupied by bulky wooden blocks. This transition also eliminates the deep, inaccessible slots of standard knife blocks, which are notoriously difficult to clean and sanitize.
Beyond spatial efficiency, custom fabrication allows for precise material matching with existing cabinetry. Engineered correctly, a wall-mounted magnetic strip provides secure, immediate access to vital culinary tools while fundamentally upgrading your kitchen's organizational workflow.
Benefits over drawer storage
Traditional drawer storage often subjects knife blades to damaging micro-abrasions. Studies in metallurgical wear indicate that edge retention can decrease by up to 30% when blades repeatedly collide with other utensils in a loose drawer. Magnetic holders prevent this edge degradation by isolating each blade in a fixed position.
Furthermore, drawer storage presents a significant safety hazard for individuals reaching blindly into confined spaces. A dedicated magnetic rack ensures that you only grasp the handles during retrieval, minimizing the risk of accidental lacerations.
When DIY is the right choice
Building a custom magnetic holder is the optimal choice when specific dimensional requirements exist within a kitchen layout. While commercial holders typically measure 12, 16, or 24 inches in length, a custom build allows for exact matching to a non-standard 19.5-inch cabinet span or backsplash tile grid.
Economics also heavily favor the DIY approach for premium materials. High-end retail models crafted from exotic hardwoods can easily exceed $150. In contrast, a custom project utilizing premium wood offcuts and bulk magnets typically requires a raw material investment of only $30 to $50, yielding a superior product for a fraction of the cost.
Materials and design basics
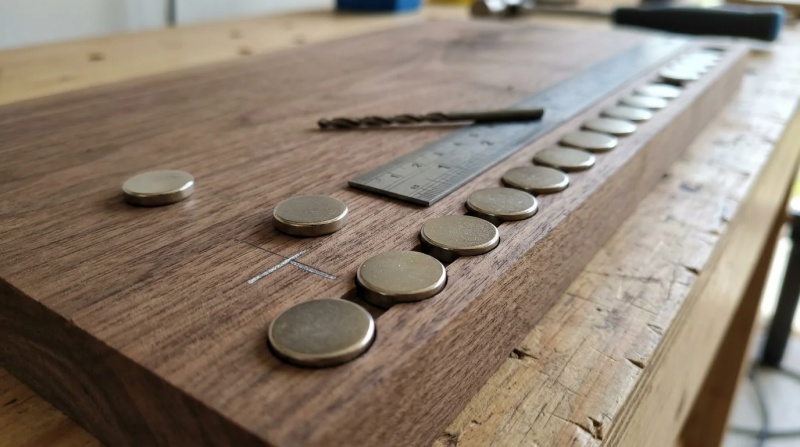
The foundational materials determine both the visual appeal and the functional holding capacity of the rack. In any magnetic storage design, the magnetic flux must penetrate the facing material without losing excessive pull force, making material selection a critical engineering variable.
Best wood species and finishes
Hardwoods are strictly recommended for the body of the holder. Species such as walnut, hard maple, and cherry boast a Janka hardness rating above 1,000 lbf, providing sufficient structural resistance against gouging or scratching from sharp knife tips.
Softwoods like pine or cedar dent easily and degrade quickly in high-traffic kitchen environments. Exotic woods like wenge or purpleheart offer striking visuals, but their high density can sometimes complicate the precision routing required for hidden magnet designs.
Magnet type, strength, and spacing
Neodymium rare-earth magnets are mandatory for secure retention; standard ceramic magnets lack the necessary flux density. Grades N42 to N52 offer the highest energy products commercially available. For standard chef's knives, a pull force of 10 to 15 pounds per magnet is required to ensure stability.
Proper spacing is equally vital. Placing the magnets 1.5 to 2.0 inches apart on center ensures that knives do not violently pull toward one another when mounted. Alternating the polarity of adjacent magnets helps create a continuous, highly localized magnetic field.
| Magnet Grade | Relative Pull Strength | Recommended Application |
|---|---|---|
| N35 | Low | Lightweight paring knives only |
| N42 | Medium | Standard utility and chef's knives |
| N52 | High | Heavy cleavers and thick-spined blades |
Hidden vs face-mounted magnet designs
Hidden magnet designs require precision routing from the rear of the board, leaving a front veneer of wood exactly 1/16 to 1/8 inch (1.5mm to 3.0mm) thick. If the wood is thicker, the magnetic field weakens exponentially, risking dropped knives; if thinner, the wood face may crack upon impact.
Face-mounted designs embed the magnets directly into the front of the wood, flush with the surface. While this maximizes magnetic contact and holding power, it exposes the metal magnets to the kitchen environment, necessitating protective coatings to prevent long-term corrosion.
How to build it step by step
Constructing the holder requires precision woodworking techniques, particularly in depth management. A typical build takes approximately 4 to 6 hours of active labor, excluding the necessary adhesive curing times.
Tools, measurements, and layout
Essential tools include a plunge router, digital calipers, and a Forstner bit matching the exact magnet diameter—typically 3/4 inch or 1 inch. Calipers are critical for measuring the remaining wood thickness at the bottom of the routed holes to the nearest millimeter.
A grid layout must be marked on the back of the workpiece before cutting. It is imperative to leave a minimum margin of 1 inch from all outer edges; routing too close to the perimeter risks structural blowout and compromises the integrity of the mounting points.
Install and seal the magnets
Magnets must be secured in their recesses using a high-strength, two-part epoxy. Standard wood glue or cyanoacrylate (superglue) lacks the shear strength required to hold the magnets against their own pull force over time.
The chosen epoxy should have a minimum cure time of 24 hours to achieve maximum bonding strength. During installation, carefully track polarity. Inserting magnets with alternating poles (North-South-North-South) optimizes the gripping force directed toward the knives rather than bleeding into the surrounding hardware.
Mount and test the holder
Mounting hardware must support both the static weight of the holder (often 2 to 4 pounds) and the dynamic pulling force exerted when removing a knife. A wooden French cleat system or heavy-duty steel keyhole slots routed into the back are the standard industry solutions.
Once mounted, rigorous load testing is required. Test the rack with a heavy 10-inch chef's knife, typically weighing around 250 to 300 grams. The blade should snap firmly into place and resist sliding downward, while still releasing smoothly when the handle is twisted away from the block.
Safety and durability checks
Long-term reliability is critical, as a failing knife holder presents severe safety hazards. Routine inspections and proper maintenance protocols ensure the fixture remains secure, hygienic, and structurally sound over years of daily use.
Common failure points to inspect
The most common structural failure point is adhesive delamination. Standard consumer epoxies can soften if exposed to ambient temperatures exceeding 150°F (65°C), which is a significant risk if the holder is mounted directly above a high-output gas range.
Additionally, mounting hardware driven directly into drywall without proper toggle anchors can fail. The repeated 5 to 10 pounds of outward pull force exerted during knife removal will eventually loosen standard plastic wall anchors, leading to catastrophic detachment.
Food-safe finishes and moisture resistance
Kitchen environments demand moisture-resistant, food-safe finishes. Film-building finishes like polyurethane can chip or shatter when repeatedly struck by a steel blade, leaving unsightly marks and exposing the raw wood beneath. Penetrating oils are the preferred alternative.
Adhering to general ISO quality standards for food-contact surfaces, builders should utilize non-toxic, stable sealants. Reapplication is typically required every 3 to 6 months to maintain an effective moisture barrier against kitchen humidity and wet hands.
| Finish Type | Food Safe | Moisture Resistance | Maintenance Interval |
|---|---|---|---|
| Mineral Oil | Yes | Low | 1-2 months |
| Beeswax Blend | Yes | Medium | 3-4 months |
| Pure Tung Oil | Yes | High | 6-12 months |
Knife compatibility and retention
It is crucial to recognize that not all knives are compatible with magnetic storage. High-carbon steel and martensitic stainless steel (such as the 400 series) exhibit excellent ferromagnetic properties and will hold securely to the rack.
Conversely, austenitic stainless steels (such as the 300 series), which are frequently used in inexpensive stamped cutlery, have very weak magnetic attraction and may slide off. Ceramic knives possess zero magnetic retention and must strictly be stored in traditional blocks or protective sheaths.
Build, upgrade, or buy
The decision to fabricate a custom magnetic knife holder versus purchasing a commercially manufactured unit depends heavily on tooling availability, budget constraints, and the desired level of aesthetic integration within the kitchen.
When to build your own
Building a custom unit is highly recommended when specific architectural constraints dictate the design. For example, mounting a holder on a narrow 14.5-inch pillar or integrating it seamlessly into custom walnut cabinetry requires bespoke dimensions that retail markets do not provide.
This route is also ideal for hobbyists who already possess the requisite plunge router, Forstner bits, and heavy-duty clamps. Utilizing existing tools negates the initial $100 to $200 tooling investment, making the project highly cost-effective and rewarding.
When to upgrade or outsource
Upgrading or outsourcing is the more pragmatic route when industrial-grade materials or specialized aesthetics are required. If a kitchen design mandates a seamless 304 stainless steel housing, or requires sanitation certification for commercial restaurant use, purchasing a pre-manufactured unit is the only viable option.
Furthermore, for individuals lacking precise depth-measuring tools or experience handling high-grade N52 neodymium magnets—which can easily pinch fingers or shatter if they snap together—buying a premium retail holder for $80 to $150 provides immediate, guaranteed functionality without the associated fabrication risks.
Key Takeaways
- The most important conclusions and rationale for Magnetic Knife Holder
- Specs, compliance, and risk checks worth validating before you commit
- Practical next steps and caveats readers can apply immediately
Frequently Asked Questions
What magnets work best for a DIY magnetic knife holder?
Use neodymium magnets, ideally N42 to N52. For most chef’s knives, choose magnets rated around 10–15 lb pull force each for secure holding.
How thick should the wood face be over hidden magnets?
Keep the front wood veneer about 1/16 to 1/8 inch thick. Thicker wood weakens hold; thinner wood can crack under impact.
How far apart should I space the magnets?
Place magnets roughly 1.5 to 2 inches apart on center. This helps create even holding power and reduces knives pulling into each other.
Can I buy suitable neodymium magnets from rcmagnet.com?
Yes. RCMagnet offers rare-earth neodymium magnets suitable for custom holders. Match the size and grade to your board thickness and knife weight before ordering.
Is a magnetic knife holder better than a drawer or knife block?
Usually yes. It saves counter space, keeps blades from rubbing against other utensils, and makes knives easier to grab safely by the handle.